by James Williams
Air compressors have pressure switch adjustments, which are hard to handle yourself if you do not have the adequate information or experience needed. In factories, supervisors usually call in external people to perform such tasks if problems arise with the air compressor.
Without the air compressor working properly, you won't be able to use your air tools properly since all the air flows required for your air tools come from the compressor itself.
If you can learn how to make the air compressor pressure switch adjustments yourself with the internal settings it has, then you can save up on the money and time spent on hiring outsiders to fix it. We'll help you learn the proper steps in doing so.
Contents
If you want to handle setting the correct pressure to the air compressor with the switch adjustments on the compressor's settings by yourself, then the following steps will guide you through properly:
You need some tools that will assist you when making pressure switch adjustments on your air compressor. The tools you need are a regular screwdriver, a flat screwdriver, an Allen wrench, a blowgun, a hose, and safety gloves.
Make sure you unplug the air compressor or disconnect its power source. This makes it easier and safer for you to touch it when you need to open the switch cover and work pressure switch adjustments.
Now that the air compressor is unplugged and cooled down, you can get to work. Wear your safety gloves so that you can avoid accidents because of the heat, compressed air, or your tools.
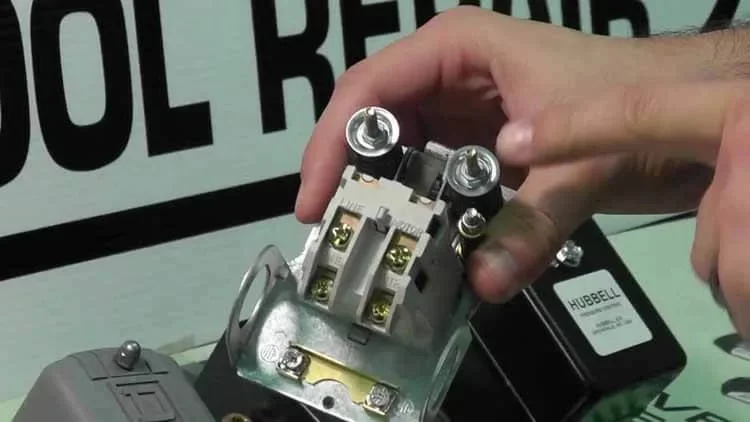
The pressure switch will have a cover or lid on top. You need to remove it so that the switch itself is exposed. It should be located right on top of the compressor. To remove it, all you have to do is get a screwdriver and screw this cover's top counterclockwise.
After you get it off, make sure to keep it somewhere safe and away from your work station in case it gets in the way or in case you lose it because it got mixed in with other equipment you are using.
Every compressor usually has 2 pressure set points. They are known as the cut-in set point and the cut-out set point. These points are basically the pressures that make the compressor start and stop. When the compressor gets to the cut-out pressure set point, it will come to a stop.
And when the compressor falls back to the cut-in pressure set point, it will kickstart again.
Here we can already understand that the cut-in pressure is meant to be lower than the cut-out pressure. This difference of pressure between the two set points is known as a pressure band. The pressure band essentially should be at least 14 to 20psi (pounds per square inch).
If the pressure band is less than 14 psi, then the compressor will repeatedly and quickly start and stop. This will burn out the motor and switch since it's wearing out the components of the compressor.
On the other hand, if the pressure band is more than 14 psi, this helps the compressor run longer. It is also healthier for the compressor since the machine will heat up more, and with time, any moisture inside will evaporate.
When you plug in the air compressor and turn it on, the compressor should start instantly. You gotta allow the machine run and let it shut off on its own. While this happens, you need to check the pressure gauge on the compressor and measure or determine the cut-out pressure when the machine stops.
You can take out the drain valve that is on the compressor. This easily helps air bleed out of the valve. But there is another method to let air pressure get released, and that is with the help of a blowgun.
Get a hose and attach it to the nozzle of the compressor. You can do this by sliding the fitting neatly onto the nozzle after you have pulled back on the air fitting. And you now need a blowgun and slide it onto the other hose end.
As the blowgun air tool is still attached to the other end of the hose, you need to hold it tightly and press on its handle. The air should start releasing from inside the compressor.
While you are doing this, do not forget to check the pressure gauge again. You will be able to see the pressure decrease while the air is being released. Since your hands are busy, you need to take mental notes of the measurement of the cut-in pressure the moment the compressor starts up again.
You need an Allen wrench for this step. There is a calibration screw on the body of the air compressor. It should be located right around the differential adjustment screw, either above it or on its left side. In some cases, the calibration screw will alone be there if your compressor does not have an adjustment screw.
Once you have located the calibration screw, take your Allen wrench and turn that calibration screw to the right.
This will enable a higher cut-in pressure. If you wish to decrease the pressure, then turn the screw to the left. A lot of air will be released when you are doing this on repeat, and you need to make sure to do the reading of the pressure set points correctly. Keep going until you get the right cut-in pressure.
It is possible to just adjust pressure settings while keeping the differential pressure settings fixed. But if you ever need to, you can make adjustments to the differential pressure along with the cut-in and cut-out pressure set points.
The compressor should have a differential adjustment screw on its body. Turn that screw clockwise with a regular flat screwdriver. This will raise the differential pressure in the air compressor. But if you turn that screw counterclockwise, then it will decrease that differential pressure.
The air will be released during the first adjustment you make. Make sure to read the pressure on the pressure gauge as you are doing this. Keep releasing air with the adjustments and measure the points until you get the right cut out pressure.
After perfectly adjusting the accurate pressure set points, you can fix everything around and finally put the switch's lid or cover back by screwing it on with the screwdriver.
The pressure switch settings are put there on the compressor so that we can make the necessary adjustments before running the air compressor for our industrial tasks.
It is important for you to know how to make the correct air compressor pressure switch adjustments on your own.
This way, you can get it to the right pressure set points so that the compressor can be used without its operation being interrupted. Not only is this important knowledge, but you also get to save up on cost by not having to hire outsiders to do this.

About James Williams
Hi, This is James from HomerDIY. I have great experience in writing about everything related to Pump and DIY tools. For the last few years, I am researching the different types of tools and sharing my opinion on this blog.
 |
 |
 |
 |
Popular Posts
 Homer
Homer