by James Williams
We know that the impeller works to generate the water pressure in the swimming pool. They're also necessary when it comes to cleaning the water in your pool.
However, your pool pump impeller might need to be changed even if you have been emptying the filter religiously. This happens when the threads responsible for holding the impeller in place on the motor shaft begin to wear out, thus causing the impeller to become unsteady and brush against the diffuser in the pump.
In times like these, a pool pump impeller replacement has to take place. However, how will you replace your pool pump impeller? Read our step-by-step guide on replacing the pool pump impeller, and you will be able to change your impeller without professional help in no time!
Contents
In this section, we'll walk you through the steps of replacing a pool pump impeller.
The first step that you will need to carry out before you start disassembling your pool pump is to disconnect the system from the power supply to avoid dangerous situations and prevent accidents from occurring.
Although simply disconnecting the pump from the mains line will be good enough, but if you wish to ensure greater safety, disconnect the pump from the circuit breaker, which you will find situated next to the timer box.
Since the pool pump deals with a lot of water simultaneously, a great deal of pressure usually builds up in it. In order to get rid of this pressure build-up, you will have to find the relieve valve placed above the filter counter and then turn it in a clockwise direction.
When you first start to turn it, some water will also come out of the valve, and that is nothing to worry about. The more water that will pass through the valve, the faster the pressure will decrease to zero PSI.
In order to carry out this step, you will first need to unscrew the nuts that secure the motor in place with the housing. Depending on the kind of pump that you use, you might have to work with four of these nuts, or you might have to work with six of them.
Whatever the number of bolts there might be, they can easily be loosened with a wrench or a pair of pliers. Next, simply pull the motor pump away from the housing.
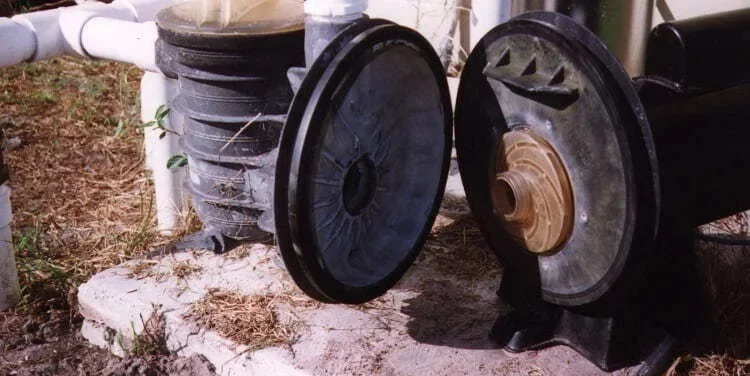
Once the two are separated, you will be able to spot the diffuser and its gasket on the motor pump. In case you do not see them, try looking inside the housing as some pool pumps might have their diffusers placed there.
Once the diffuser has been spotted, you will need to take it off. To do this, you will not need the help of any additional equipment since the diffuser can usually be pulled away from where it is set.
For this, you will need to carry out a few procedures.
The covering at the rear end of the motor shaft can be removed by simply unscrewing the two nuts that secure it in place.
Before you proceed to do this, place a screwdriver between the two leads of the capacitor. Doing so will help the capacitor let go of the charge previously stored, hence preventing any possibilities of you suffering from an electric shock.
You will see that only one screw is responsible for holding the capacitor in place, so you can simply loosen the screw and then gently push the capacitor aside.
You will now see the flattened end of the motor shaft you were looking for. Take a 7/16-inch wrench and use it to fasten the shaft in place so that it does not move.
However, remember that all these steps should only be carried out if your pump requires you to do so. In many cases, duringthe impeller replacement, the motor shaft will have some niches in it where you will be able to insert your regular screwdriver.
Pumps like these will not require you to use a wrench or even discharge the capacitor since the openings will usually be noticeable right after removing the covering.
Once the motor shaft has been secured in place, with the help of a strap wrench, carefully twist the impeller in an anti-clockwise direction to take it off of its position.
Once the impeller has been removed, you will be able to spot the shaft seal on both the impeller itself as well as on the shaft's seal plate. Twist off the seal, which is on the impeller, and try to remember how it was placed on the impeller so that you will know how to place the new one later on.
Moreover, do remember to check if your new shaft seal comes with a metal collar or not. If so, then remove the metal collar from the old shaft, or otherwise, it will not fit properly. While doing so, be careful not to touch the topmost part of the seal since it can lead to its corrosion.
Take the seal that you previously removed from your old impeller and fit it onto your new impeller in the same way it was sitting on the old one. Afterward, without taking the wrench off of the motor on the other end of the shaft, tighten the impeller back in its original position by turning it in a clockwise direction with your hands.
Using a screwdriver, re-tighten the screw that held the capacitor in place and then move on to doing the same to the nuts that held the rear cover of the shaft over the wiring.
Before placing the gasket back above the impeller, see if it is starting to wear out. If so, then get a replacement for it and then snap the diffuser back on while strictly following the instructions stated on the diffuser and the seal plate.
Cover the motor with the housing once again and then secure it by tightening the screws you previously took off.
When doing so, keep the numbering on the bolts in mind, and maintain a sequence of 1, 3, 2, 4 if your pump has four bolts. If the pool pump has six screws, then place them back in their slots in a 1, 3, 5, 2, 4, 6 sequence.
Next, close the pressure valve before moving on to putting the pump back in place. Remember to fill the strainer of the pump with some water and reconnect the system to the circuit breaker before putting it back in its place.
This brings us to the end of our article for today. We hope by reading this, you were able to learn more about pool pump impeller replacement . See you again soon!

About James Williams
Hi, This is James from HomerDIY. I have great experience in writing about everything related to Pump and DIY tools. For the last few years, I am researching the different types of tools and sharing my opinion on this blog.
 |
 |
 |
 |
Popular Posts
 Homer
Homer