by James Williams
Not having enough space in your garage is more common of a problem than you'd think it is. Walk into the garage of most households, and you will find an immitigable mess of leftover paint, tools, scrap woods, and children's playthings.
Whether you are thinking of buying a new car or starting your own workshop, you'll need sufficient space in your garage to turn that thought into reality.
Organizing your garage from the ground up may seem like a task only fit for Olympians, but with a little bit of information and proper tools for the job, you can be the organizer-in-chief of your garage tools.
Here, we will discuss the top 10 garage tool organization ideas on how you can spruce up your garage and give yourself the desired space.
Contents
For most of the systems detailed below, you will need the following tools -
Here are the ideas you can implement in your kitchen.
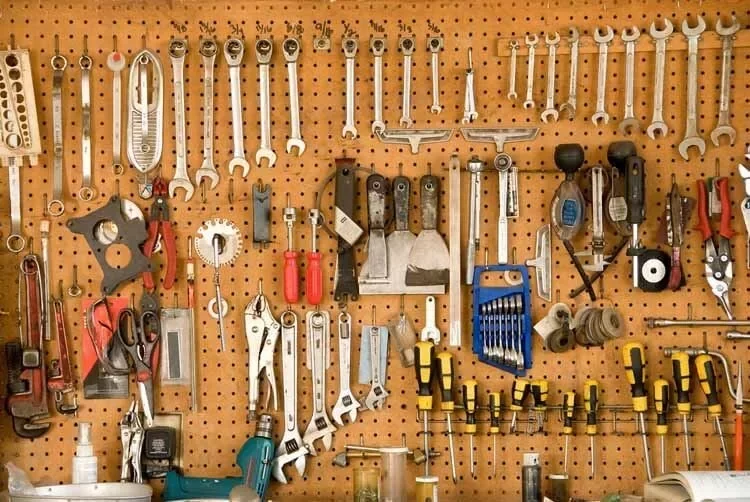
Pegboards are one of the most commonly used items for storing your tools. Your garage probably already has some pegboards fitted on the wall. However, there might not be enough of them, or they may have worn out over time.
You can easily attach new ones by yourself. Use the stud finder to find the studs in the wall of your desired location and screw in your pegboards. If your studs are too far apart, you can use 1×4 or 1×6 boards as support for hanging the pegboards.
With the help of a pegboard accessories kit, you can hang almost all of your non-power tools on it.
These cardboard tools can be an ingenious solution for organizing your garage tools. They can hold longer tools such as rakes and mops, or your sports kits like your baseball bat or badminton racket.
Remember to put them on a platform about 2 inches high from the ground to keep them from getting wet. They are made of cardboard, after all.
While having multiple recycle bins is necessary nowadays, they can eat up a lot of your limited floor space. You can easily create hangers for them on your wall for almost no cost at all.
To get started, you'll need some 1x4s and 2x4s. Their lengths should be 2 inches shorter than the length of your bins.
Now you can stand your bin on the lower 2×4 while the upper 1×4 will stay in front of the rear end of the bin and keep it hanging.
There are ceiling-mountable shelves that can carry a substantial load. They can be a godsend for storing your camping gear, coolers, and other large containers. You can find them in most hardware stores or on Amazon and Home Depot.
You might not have noticed this, but the corners of your garage are unused real-estate. And you may have a waist-high cabinet, or a bin pushed into the corner, but what about all the corner space above?
It is very easy to make a nice and sturdy corner shelf with scrap plywood. Use 6 inches long 1×1 cleats along both sides of the corner as support for the shelves. Attach 2 long thin boards along the outer edges of the clits on either side.
Now, cut small plywood boards so that they fit in the slots, and you have yourself a nice space-saving shelf for keeping any small cans, bottles, or boxes.
These holsters can store almost anything that can fit into them, and they are extremely easy to make. You can fit onto any surface you want. They are especially handy for keeping adhesive tubes.
For this, you'll need 2 or 3 inch PVC pipes. Cut the required length of a PVC pipe at an angle at one end and level on the other end. The angled end will be the top of your holster.
Screw the top of the angled end to the desired position on a surface. Now, use a long screw from the outside to go through the diameter of the pipe and firmly screw it to the wall. The bottom screw will hold up anything with a wide base.
This is the simplest method for organizing your garage tools. If you already have a lot of shelf space in your garage and don't want to go through a lot of woodwork or heavy lifting, then this method is for you.
Take an inventory of the stuff in your garage that you need to organize. Now, simply categorize them in different classes as you see fit, such as - decorations, paint, gardening, etc.
Get one bin for each of the categories and fit them in the bin. You can use small cardboard cutouts as separators inside the bin to keeps things organized. Label each bin as needed and store them on the shelves.
While this is the easiest method, this also is the least organized and saves you less space than the other ideas.
If you are a fishing enthusiast or just a hobbyist, storing your fishing rods safely is should definitely be a concern for you. By using a PVC pipe and a foam noodle, you can make yourself a great storage system for your rods.
Drill a few holes into a 3-inch PVC pipe 5 inches apart. Make sure the holes are big enough for the handles of your fishing rods to fit in there. Now take the foam noodle and cut slits into with, again 5 inches apart.
Attach the PVC pipe at the desired height on a wall with the holes facing the ceiling. Fit one of your rods into the pipe and mark where the upper support needs to be. Screw in the foam noodle at the marked height with the slits aligned with the holes.
To store your rods, simply put the handles in the holes and slide the length of the rods inside the slits in the foam.
You can build some shelves for yourself really quickly if you lack shelf space in your garage to organize your stuff. Get 2 steel rails and as many brackets as you need to build yourself some shelves.
Find the studs in your wall and draw a vertical line along the 2 studs you'll fix your rails onto. Then simply line up the rails and screw them into place. If you have lined them up correctly, each screw will go into a stud.
Attach the brackets into the rails as you need them and place 1×12 boards of required length onto the brackets. And just as easy as that, you have yourself some nice shelves to organize your tools onto.
If your joists are exposed, you can use the space between them to store a few things and lessen the load on your garage floor. Get some wire racks of your desired length and 12-16 inches' width.
Screw the wire racks firmly to the bottom side of the joists and to the walls. Use some extra plastic clips if needed. You'll have a nice space for storing small bins of accessories.
Using these garage tool organization ideas, you will certainly be able to claim back some of the precious floor space in your garage. So, put on your work boots and bring together your garage just the way you want.

About James Williams
Hi, This is James from HomerDIY. I have great experience in writing about everything related to Pump and DIY tools. For the last few years, I am researching the different types of tools and sharing my opinion on this blog.
 |
 |
 |
 |
Popular Posts
 Homer
Homer